ajrawson.com
Writing code and having fun doing it!
Project maintained by ajrawson
Hosted on GitHub Pages — Theme by mattgraham
12/10/2010
This post will cover adding a redirect for a specific URL in IIS7. In my case I needed to do a redirect from a site with the url www.yourdomain.com/new to a url with a different subdomain, for example new.yourdomain.com. But this example can be used for any redirect in IIS.
To start with you’ll want to make sure your Web Server (IIS) role has the HTTP Redirection Role Service installed. Your role services should look similar the example below.
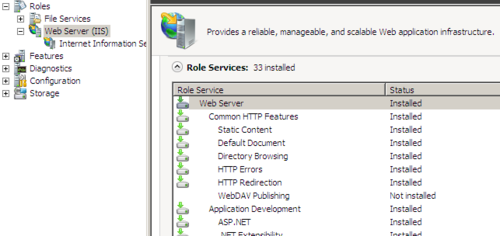
If you don’t have the HTTP Redirection Role installed, select the Add Role Services link. In the Add Role Services dialog box select the HTTP Redirection option from the list and press the Install button. You now should have successfully installed the Role Service within IIS to allow you to perform URL Redirections.
Now you should open the IIS Manager on your server, select one of the sites listed on your server, and in the Features View window under IIS you should see the HTTP Redirect option available to you. The features icon is shown below.

I like to do my redirects from virtual directories (if there already isn’t a directory created), I do this because I work with MVC applications and don’t want a random folder to cause any issues with my main application and routing. What I usually do is create a empty folder called Redirect in my C:\inetpub folder. I then create a virutal directory in the Site I want a redirect performed in, pointed to my Redirect folder I just created.
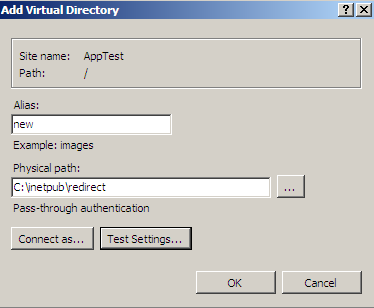
To create the virtual directory right click on the site your working with and in the context menu select Add Virtual Directory, the Add Virtual Directory dialog box should appear. In the alias textbox you’ll want to put the content part of what you want your url to be, in the case of my example www.yourdomian.com/new and then you’ll want to point the physical path to the redirect folder you just created in C:\inetpub. If you are running your site under a named user or a specific user you will want to set that information up through the Connect as button. To test your virtual directory to make sure it is authorizing and authenticating properly you can click the Test Settings button. If everything is good you should see only Green icons in the screen. Your dialog box should look something like the example I have below.
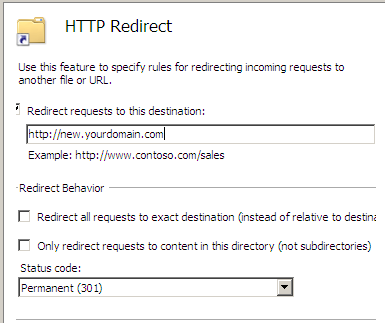
Now that your virtual directory is setup, you’ll want to add the Redirection configuration. Click on the virtual directory to highlight it, then find the HTTP Redirect option under the Feartures View page, and select that option. The HTTP Redirect Page should now appear, check the Redirect requests to this destination check box and this should now allow you to make changes to this page. In the textbox you’ll want to place the URL of the web address you want to redirect to, in the case of my example we chose new.yourdomian.com. You’ll next select the Redirect Behavior options you want, check either of the check boxes if they apply to the redirect you are trying to perform and then select the status code you want used for your redirect.
The options are:
Found (302): This redirect tells the client to perform a normal/new redirect to the URL
Permanent (301): This is a permanent Redirect and tells the client this URL has permanatly moved from www.yourdomain.com/new to new.yourdomain.com
Temporary (307): This redirect tells the client that for now use the new URL new.yourdomain.com, but in the future www.yourdomain.com/new will be used again.
The image blow is an example of what your HTTP Redirect options should look like.
Hope this post helps you get going on performing URL redirects on your websites. If you have any questions or comments please feel free to leave comments below.
Tags: IIS
10/29/2010
Recently I was tasked with creating and setting up an ASP.Net MVC web application that was to be deployed on a new Windows Server 2008 virtual machine that was running IIS 7.5. Being a newbie to IIS, I had a lot to learn to get this completed. After much trial and error, research, and help from my twitter friends I was finally able to get the site up and running. Below is the steps I followed to get the site up and running.
-
Setup IIS on the machine, in my case I just had to add the IIS Role to the list of Roles my server was going to be responsible for. If you’re setting up IIS on your own personal windows machine, you’ll just add IIS by going to the Programs section of Control Panel. Once you’re in the programs window you’ll click the link “Turn Windows features on or off” and check the IIS features you want turned on for your instance of IIS. In either case you’ll want to turn the settings on that will apply to your website you plan to run, for examples if your planning on only running forms authentication you won’t have to include the windows authentication features or vice versa.
-
The next step you’ll take is to setup your Application Pools for the websites you’ll be running on the server. Open up the IIS Manger, expand the node with your Server name on it and click on the child Node named Application Pools. You’ll see a list of default application pools appear on the right hand side of your IIS Manager (See Figure 1).
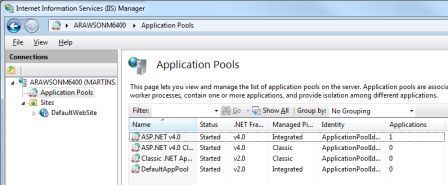
(Figure 1)
In the case of my web site I’ll be running a .Net 4.0 MVC2 web application and I will be using the Default ASP.NET v4.0 Application Pool. You can add or edit Application Pools as you need from this form, I am just going to stick with the Default pools for this website. Below is the basic settings I am using for this Application Pool. (See Figure 2)
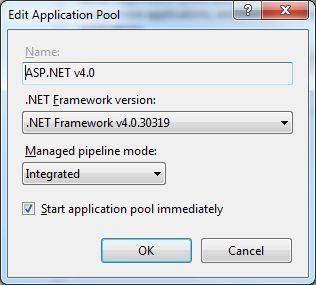
(Figure 2)
As you can see from the basic settings, I’m using .net Framework version 4.0 and the pool is set to run in Integrated mode. The other pipeline option you can use besides Integrated is Classic, I’m choosing integrated mode so I can use MVC’s routing capabilities.
-
The next step we will perform is to create a new website in the IIS Manager. If you open the “Sites” node you’ll see a Default website, I usually delete this default site, and in the future any additional websites that are running on this server. We’ll now add our Site to IIS that will hold/run our MVC application. Right click on the Sites node and select “Add Web Site” you’ll then be presented with the Add Web Site form. (See Figure 3)
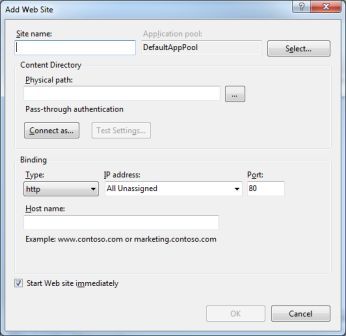
(Figure 3)
-
The next step you’ll want to perform is to setup the basic information for your website. You’ll first want to give your website a name by filling in the Site name text box. The name you choose for the site name is only a unique name for IIS and has nothing to do with website name that people will use to access your website. You’ll then want to select the proper Application Pool you want to run your site under. This should be the Application Pool that you setup in setup 2. The next step will be hooking up the actual website files with our IIS Web Site configuration. Click the … button and browse to the file path of the MVC application files that have been uploaded to the server. (See Figure 4)

(Figure 4)
-
You’ll now want to setup your websites Bindings (See Figure 4). Since our site is a normal website you’ll want to run the site as http, you can leave the IP Address alone or assign it to the provided IP address, and port 80 will work perfectly for our website. The final part of setting up the bindings is providing a host name for the website, this is the name the website will expose to the outside world. You’ll want the host name to be something like www.test.com, beta.test.com, or www.test.com/beta. If this is your default site you can leave the host name blank to access the site but if you have multiple websites running in this IIS instance you’ll want to provide a host name.
-
By default websites run under the servers IIS_IUSRS username this is fine unless you want to run the user under a user in active directory. I like to run my sites under an named user in active directory 1. because most of my websites need to access data on a network file share server, 2. because I want to restrict the website to only have access to the specific folders on the server and system it needs access to. This is also helpful if you are running multiple websites on your server and want to restrict one website from accessing folders used by another website, all you have to do is run the 2nd site under an different active directory user. In Figure 4 you can see the Connect As button on the Add Web Site screen, if you click that you’ll see the Connect As form. (See Figure 5)
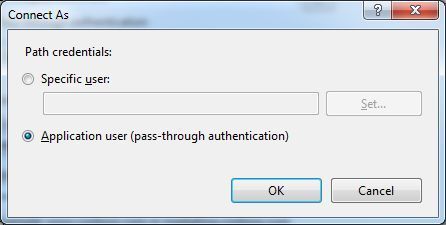
(Figure 5)
If you leave the Application user radio button checked the website will run under the IIS_IUSRS username. In my setup I check the specific user radio button so that I can use an active directory user. I then fill in the appropriate information for the specific user I want to run the site under. (See Figure 6)
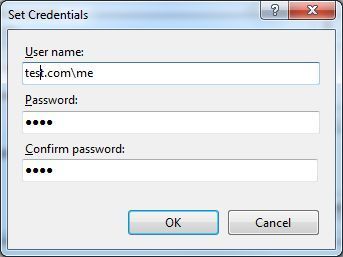
(Figure 6)
Click Ok and now your site is setup to run under an active directory user. You now just have to setup the permissions on the specified folders you want the site to have access to for that specific user. To test and make sure the websites file path and permissions are setup properly, you can click the Test Settings button on the Add Web Site form (See Figure 4) to check your settings.
-
If you do setup the site to run under a specified user and not the default user. Make sure that user has permissions to write to the C:\Windows\Microsoft.Net\Framework64\v4.0.30319\Temporary ASP.Net Files folder. If you do not give the user proper permissions your site will not load and will log errors in the application error log on your server.
Hopefully this post helps you, or if you have any additional ideas on how to setup IIS to host an MVC app please post them in the comments. Thanks!
Tags: IIS and MVC
10/16/2010
I came across an issue the other day with the DropDownListFor Html Helper in ASP.Net MVC 2. For some reason the selected value of the drop down list was not being set by the HTML Helper, but only seemed to happen with one instance of the overloaded functions. My issue became apparent when I was validating data in my controller and sending the populated ViewModel back to the view if the data was invalid. I wanted all the previously selected values and text to retain their previous values but for some reason the DropDownListFor’s were not working. For Example in the code snippet below is the DropDownListFor that wasn’t working for me.
[image lost]
I’m passing in the Manufacture and ManufacturerList to my View through a view model, the ManufacturerList is a prepopulated list of manufacturer names stored as string values. The Manufacturer stores the selected value from the ManufacturerList. Here is what my controller looks like
Function Search(ByVal itemSrch As ItemSearchViewModel) As ActionResult

     If Not ModelState.IsValid Then Return View(itemSrch)

     'some mapping code and model stuff
     'return a new view

End Function
And this is what my ViewModel looks like:
Public Property Manufacturer As String

Public Property ManufacturerList() As List(Of String)
If I use an overloaded method by setting the data text and data value fields everything seems to work fine, for example:
[image lost]
The only problem is that in my case the ManufactuerList is not a Manufacturer object but a list of String values containing Manufacturer names. I am there for stuck using the first DropDownListFor function that I showed in this post. I did a bunch of testing and debugging to see if I could figure out if it was something that I was doing wrong or something in the DropDownListFor helper I was using. I came to the conclusion that it was the DropDownListFor helper code, when I tested the value of the Manufacturer property upon page refresh the property was populated. After a bunch of research on the issue and looking for a solution to the problem, and I couldn’t find a good one, I figured I’d dig in and see if I could come up with something.
My first thought was trying to move the populating of the SelectList outside of the View. So I moved the SelectList to my ViewModel and changed the ManufacturerList property to be a SelectList. I didn’t even get as far as testing to see if this would work before I decided this was a bad idea. All I could think of was, “What if I have to use this ViewModel in some other application and its not an MVC app”. If I had left the SelectList in the ViewModel I’d be stuck with using that or creating a new ManufacturerList in the ViewModel that was a List(Of String) and that seemed redundant. So I trashed the idea of putting the SelectList in the ViewModel. The next, and what ended up being the final, idea I had was to use jQuery to set the selected value on the drop down list once the page had loaded. I knew for certain from my earlier testing that the Model was holding the Manufacturer value, I just needed to get it to be the selected value of the drop down list. So with the help of jQuery’s ready handler I set the value of the drop down list to be that of the Manufacturer property contained in the Model. Here is the jQuery code I used:
$(document).ready(function() {

    $("#Manufacturer").val("");

});
And ta-da my problem was fixed, the jQuery code was now setting the selected value of the drop down list to that of my Manufacturer value. For the sake of those who don’t want to use jQuery also tested this just using good old javascript and that worked as well. You just need to setup some javascript to run when the page loads and set the drop down list value using the code below:
document.getElementByID("Manufacturer").Items.FindByValue("").Selected = true;
Hopefully this helps someone, and also if you have any other advice or see any problems with my solution please leave a comment. I’d appreciate it. Thanks.
Tags: MVC
06/18/2010
Was doing some research on how Windows Authentication worked in an ASP.Net MVC application I was working on for work and wanted to get research and testing written down for future reference. Hopefully if you read this you’ll find it helpful as well, or if you have any additional info or advice please share them in the comments.
It looks like in IIS6 & IIS7 when you’re using Windows Integrated Authentication it first tries to use Kerberos to authenticate, then if that fails it tries NTLM authentication, and after that it will stop unless you have basic authentication enabled. Kerberos tries to use your current network credentials to verify authentication, I believe this is ‘Negotiate’ in the HTTP response header. If it can log in using Kerberos the user will receive no username and password request popup and will be directly logged into the site. From my testing it looks as if this only works in IE, tried in Firefox and I was prompted. My testing was on a test app in IIS7 using IE 8, I did have some luck in IIS6 with this as well but was lacking a good testing environment. So if a user is on the network, and Kerberos is working, the user should never have to supply their username and password at the time of page authentication.
HTTP/1.1 401 Unauthorized Content-Type: text/html Server: Microsoft-IIS/7.5 WWW-Authenticate: Negotiate WWW-Authenticate: NTLM X-Powered-By: ASP.NET Date: Fri, 18 Jun 2010 20:04:25 GMT Content-Length: 1293 Proxy-Support: Session-Based-Authentication
NTLM will prompt the user for valid username and password credentials for the network login for the particular site, this is NTLM in the HTTP response header. This is normally encrypted, only times this is not encrypted is on a browser IE2 or older, or non major browser. Biggest browser that has been known to not support encrypting NTLM authentication was Chrome, but apparently they have or are going to fix that at some point soon. If NTLM is not supported the credentials get passed as plain text. This is the type of authentication that users receive when they receive a user log in dialog box.
Host: stewie User-Agent: Mozilla/5.0 (Windows; U; Windows NT 6.1; en-US; rv:1.9.2.3) Gecko/20100401 Firefox/3.6.3 Accept: text/html,application/xhtml+xml,application/xml;q=0.9,/;q=0.8 Accept-Language: en-us,en;q=0.5 Accept-Encoding: gzip,deflate Accept-Charset: ISO-8859-1,utf-8;q=0.7,*;q=0.7 Keep-Alive: 115 Connection: keep-alive Authorization:
NTLM Blah Blah Encrypted stuff who cares If basic authentication is enabled then the site will prompt the user for login credentials and it will pass those credentials to the server via plain text. This only happens if all other log in validation types fail and basic authentication is enabled. If you want to view what data is being passed across the network through you HTTP requests and response I recommend Firebug if your using Firefox and Fiddler for IE and Firefox.
Tags: IIS
05/14/2010
Recently I stepped down as the president of the Cedar Valley .net User Group to take a more supportive role in the group. I wanted to step down because I felt like I wasn’t able to give the group the attention it deserved since I started Grad school. Doing well and getting the most out of my Grad school experience is more important to me right now then running the user group. I don’t think that’s a bad thing, you just evolving priorities and at this time it’s Grad school. I am still going to be involved with the group but just not to the level I was previously.
I had an amazing experience running the CVINETA user group, and wouldn’t give up that experience for anything. I met some amazing developers and IT people in the Cedar Valley and the guys that assisted with leading CVINETA were amazing. Here is my top 3 things I’ll take away from my time as CVINETA president. (I hate lists but couldn’t think of a better way of doing this)
-
It forced me to be a better developer - Just being around developers more and sharing ideas with my peers at the user group meetings started making me a better developer. I started to care about my craft, and finally started to treat it as a career and not just a job. I’ve always been a leader by example and that’s what I wanted to be for members of CVINETA and I could only do this by pushing myself to be a better developer.
-
Made some great friends/networking connections - The people I met through the user group that I probably would’ve never met before was another aspect that I loved about being president. I met some great local developers and loved chatting with them at user group meetings and over lunches about development topics and everything else under the sun. I also got the chance to meet and get to know some of the leaders and developers I respect in the region by having them come speak at the user group or introducing myself at regional events.
-
Great leadership experience - My experience as the leader of CVINETA is what pushed me to finally start my journey to get my MBA. I had been putting off starting my Grad school journey, I’m not sure why, but after a few months as the user group leader it became strikingly apparent to me that I wanted to get started on my MBA.
And finally I want to pass on some words of advice for those who are involved in leading groups.
-
Get Help - And not just from a therapist:). Find and recruit anyone that will help you with running the group, you can’t do it all yourself. I was lucky enough to have 4 others help me with the group, and it worked out that we all kinda fell into our strengths. My only rule was I didn’t want to have much to do with getting sponsorship money, cause I hate asking for money, and a couple guys picked that role up and got us some great local sponsors for our meetings. Just remember the more people you have involved with the group the better it will be and utilize your strengths and the strengths of those volunteers.
-
Don’t take it personal - For the first few months I valued the quality of each meeting by how many people attended the meeting. As much as you try and push to get attendance up for meetings, some people just don’t want to come. It took me awhile but I finally realized that I need to value each meeting not on how many people attend the meeting, but on how well the meeting helped and was received by the people who attended the meeting. No matter how much you try to get people to care about the meetings and get them to attend, they will never care about it as much as you and that’s OK.
-
Recruit - Talk about the group to your IT peers as often as you can, if you meet someone from another company introduce yourself as the leader of the user group. All of these help introduce or remind people about the user group and that its there to help and support them.
If I had one major disappointment in my time as the CVINETA president, it was that I wasn’t able to get senior level programmers involved much with the group. I really wanted some top level developers from the area to attend meetings and ask some good quality questions that a junior or mid level developer wouldn’t think of asking. I always saw this is a quality aspect of other user groups (CRINETA) and was really disappointed I couldn’t get that to happen in my time at CVINETA.
Finally I’d like to wish Mike Cole, the next president of CVINETA, the best of luck with the user group. I hope his vision and leadership can take CVINETA to new heights and help improve the development community in the Cedar Valley.
Thanks to everyone who attended and helped with CVINETA you all rock!
Tags: Personal