Recently I was tasked with creating and setting up an ASP.Net MVC web application that was to be deployed on a new Windows Server 2008 virtual machine that was running IIS 7.5. Being a newbie to IIS, I had a lot to learn to get this completed. After much trial and error, research, and help from my twitter friends I was finally able to get the site up and running. Below is the steps I followed to get the site up and running.
-
Setup IIS on the machine, in my case I just had to add the IIS Role to the list of Roles my server was going to be responsible for. If you’re setting up IIS on your own personal windows machine, you’ll just add IIS by going to the Programs section of Control Panel. Once you’re in the programs window you’ll click the link “Turn Windows features on or off” and check the IIS features you want turned on for your instance of IIS. In either case you’ll want to turn the settings on that will apply to your website you plan to run, for examples if your planning on only running forms authentication you won’t have to include the windows authentication features or vice versa.
-
The next step you’ll take is to setup your Application Pools for the websites you’ll be running on the server. Open up the IIS Manger, expand the node with your Server name on it and click on the child Node named Application Pools. You’ll see a list of default application pools appear on the right hand side of your IIS Manager (See Figure 1).
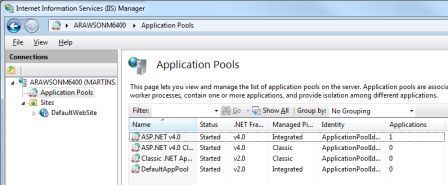
(Figure 1)
In the case of my web site I’ll be running a .Net 4.0 MVC2 web application and I will be using the Default ASP.NET v4.0 Application Pool. You can add or edit Application Pools as you need from this form, I am just going to stick with the Default pools for this website. Below is the basic settings I am using for this Application Pool. (See Figure 2)
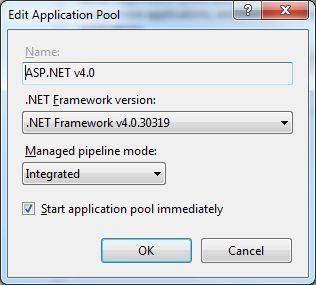
(Figure 2)
As you can see from the basic settings, I’m using .net Framework version 4.0 and the pool is set to run in Integrated mode. The other pipeline option you can use besides Integrated is Classic, I’m choosing integrated mode so I can use MVC’s routing capabilities.
-
The next step we will perform is to create a new website in the IIS Manager. If you open the “Sites” node you’ll see a Default website, I usually delete this default site, and in the future any additional websites that are running on this server. We’ll now add our Site to IIS that will hold/run our MVC application. Right click on the Sites node and select “Add Web Site” you’ll then be presented with the Add Web Site form. (See Figure 3)
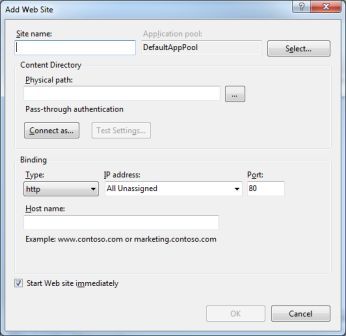
(Figure 3)
-
The next step you’ll want to perform is to setup the basic information for your website. You’ll first want to give your website a name by filling in the Site name text box. The name you choose for the site name is only a unique name for IIS and has nothing to do with website name that people will use to access your website. You’ll then want to select the proper Application Pool you want to run your site under. This should be the Application Pool that you setup in setup 2. The next step will be hooking up the actual website files with our IIS Web Site configuration. Click the … button and browse to the file path of the MVC application files that have been uploaded to the server. (See Figure 4)

(Figure 4)
-
You’ll now want to setup your websites Bindings (See Figure 4). Since our site is a normal website you’ll want to run the site as http, you can leave the IP Address alone or assign it to the provided IP address, and port 80 will work perfectly for our website. The final part of setting up the bindings is providing a host name for the website, this is the name the website will expose to the outside world. You’ll want the host name to be something like www.test.com, beta.test.com, or www.test.com/beta. If this is your default site you can leave the host name blank to access the site but if you have multiple websites running in this IIS instance you’ll want to provide a host name.
-
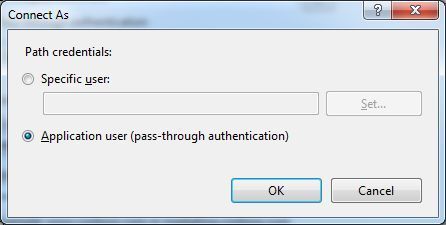
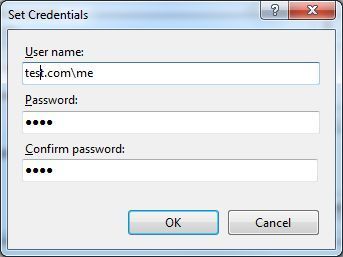
By default websites run under the servers IIS_IUSRS username this is fine unless you want to run the user under a user in active directory. I like to run my sites under an named user in active directory 1. because most of my websites need to access data on a network file share server, 2. because I want to restrict the website to only have access to the specific folders on the server and system it needs access to. This is also helpful if you are running multiple websites on your server and want to restrict one website from accessing folders used by another website, all you have to do is run the 2nd site under an different active directory user. In Figure 4 you can see the Connect As button on the Add Web Site screen, if you click that you’ll see the Connect As form. (See Figure 5)
(Figure 5)
If you leave the Application user radio button checked the website will run under the IIS_IUSRS username. In my setup I check the specific user radio button so that I can use an active directory user. I then fill in the appropriate information for the specific user I want to run the site under. (See Figure 6)
(Figure 6)
Click Ok and now your site is setup to run under an active directory user. You now just have to setup the permissions on the specified folders you want the site to have access to for that specific user. To test and make sure the websites file path and permissions are setup properly, you can click the Test Settings button on the Add Web Site form (See Figure 4) to check your settings.
-
If you do setup the site to run under a specified user and not the default user. Make sure that user has permissions to write to the C:\Windows\Microsoft.Net\Framework64\v4.0.30319\Temporary ASP.Net Files folder. If you do not give the user proper permissions your site will not load and will log errors in the application error log on your server.
Hopefully this post helps you, or if you have any additional ideas on how to setup IIS to host an MVC app please post them in the comments. Thanks!